Showing posts with label dremel. Show all posts

Sunday, September 2, 2007

SGeezuz is Risen!

For some time now my SG Special Faded (2002-ish w/ the half moon inlays, too cool for words) has been in some sorry shape. It just sounded dull. Imagine you have the deadest strings you've ever had in your life only worse. Even brand new strings would sound bright but there'd be this weird undercurrent of mud. I couldn't figure it out. I swapped in two different sets of pickups and dropped in a replacement bridge and it sounded different, maybe better, but there was still a general problem w/ the overall sound. Eventually, I narrowed it down to the bridge posts. This had been my one workhorse guitar for many, many years and over time my sweat had actually weakened the wood around the original posts. As you can see here, especially on the bottom, it is pretty gross:


(Also, you can see the GFS Crusader pickup I have in the bridge there. Great sounding pickup. Judging by the appearance it is meant to be a Duncan Invader clone and I guess it is pretty close in terms of output but maybe it's not quite a snarly and a little warmer sounding.)

Now since the wood surrounding the posts was the problem, I was either going to have to drill them out and dowel them or find a bridge w/ larger posts. I opted for the later. The bridge I used is a Gotoh tune-o-matic:


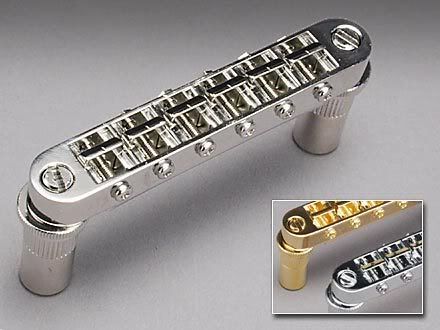
As you can see, they mount on big bushings almost like a wraparound bridge. Some people don't like Gotoh hardware but I think they're nuts. I have some Gotoh mini tuners on my baritone and I think they're as good as anything. I think they get a bad name because they're more of a budget brand but, honestly, they're made in Japan and I doubt many humans on this planet could tell the difference between their stuff and, say, Schaller in a practical setting (not to say that the Schaller aren't made better--I don't know one way or the other).

The installation of this is simple (though it took a good deal of web searching for me to be satisfied that I knew what I was doing). You just drill holes and tap 'em in w/ a mallet. It's that simple. I wanted to use an 11 mm bit but my local orange warehouse of overpriced tools didn't have metric bits. I settled for 7/16 inch. Since my drill press isn't large enough to drill tune-o-matic posts, I made a little guide out of some scrap MDF. To judge my depth I used a piece of masking tape, which always works like a charm.

As you can see, there' s not much marine of error between he depth I needed for the bushings and the thin SG body:


I very carefully drilled through a piece of masking tape. (The tape keeps the finish from chipping--not a big deal on this guitar.) It worked well enough:


I pressed in the bushings w/ my fingers and then gave 'em a few good whacks w/ a rubber mallet for good measure. I'm not sure if this is the right way to go about things but it feel sturdy to me. The holes in the pick guard weren't big enough for the bushings so I routed it out to fit them. Kinda got a little wild w/ it so it's not pretty:


Fortunately, this is mostly covered by the bridge posts once it's fully installed. It also so happens that the tops of the bushings are just about flush w/ the pickguard.

W/ that taken care of, I decided I might as well change out the tuners while I was at it. I had some Planet Waves auto-trimmers on there for a couple years and while I like 'em OK, I could never really get used to them. Also, I lost a piece of one of them so I had to put on of the original Gibson tuners on there, which looked kinda cool in a used and abused kinda way:


I liked the look of the stock Gibsons but I thought I might try something else just because so I got some Grover keystone style ones that looked the same but hopefully are a bit higher quality. These are a cinch to swap out. Unscrew the nut on top w/ a wrench and and take out the screws on the back. Do the reverse to get the new ones on. Voila!


And there she is, the SGeezus. I need to give it a couple days to be sure but as of now it's looking like the new bridge fixed her right up. Since I detune two and a half steps down, the intonation is a little off (always the case w/ tune-o-matic bridges) but the sound is much, much clearer now.

Saturday, June 2, 2007

Neck Holes, Bridge Holes and Jack Holes Too

I wanted to try one more thing w/ the neck pocket before going out back and re-leveling it w/ a router. The neck holes, as I originally drilled them, were a bit too small. I drilled them so that the screws bit into them a little bit, thinking this would add some stability to the neck joint. What it really did was make it so that the screws couldn't draw the neck to a snug fit because they couldn't turn freely. I redrilled them w/ a bit one size larger and now I'm satisfied w/ how snug the neck screw in:


W/ that taken care of, it was time to install the bridge--a task which I had been feeling considerable anxiety over. None of my pictures of the process of lining up the bridge didn't come out (the pencil lines I drew didn't stand out enough to make them worth posting) but basically, I measured and remeasured, squared and resquared until I was satisfied I had the sucker in the right place. Then I drilled the holes carefully w/ my hand drill. As far as I can tell, it is nice and straight:


The bridge is a top-loading strat-style fixed bridge. I went w/ it for a few reasons, not the least of which was I wasn't confident in my ability to drill the string-through ferrules (now I realize that it would be no problem). I also just plain think it's a pain in the ass to have to thread strings through the back of the guitar. (So I took the easy rout? Sue me.) I bought the cheapest one I could find off eBay and later found out the reason it's so cheap is it didn't come w/ the mounting screws. I went ahead and got some good wood screws from my local but not locally owned mega warehouse of supplies for the home and garden. I put some strings on it and it all lines up and seems sturdy so I will leave it at that for now.

For the jacks, I followed a pretty straightforward process. First, I found where I wanted them to go and drilled a pilot hole for each:


Then I used a wood boring bit to drill the holes.The bit is either an improved version of a spade bit or a half-ass auger bit depending on how you count. One way or the other, it's a rather vicious looking implement:


Of course, my crappy little drill did not like pushing that three-quarter inch bit through an inch of mahogany and it bound up:


Eventually, I managed to yank it out and drill the holes the rest of the way through. Naturally, there was no possible way they could've ended up straight and they didn't:


So I put a drum sander into my cheesy Dremel knock-off:


I had at it for about five minutes and eventually got things looking pretty straight (unfortunately, they are not so straight now that I've screwed them in):


Since I had the Dremel out anyway, I also cleaned up that ugly mistake I made in the control cavity:


Compared to the third picture in this post, it's much, much better even if it's not perfect. I think I've gotten it to where I can live w/ it--not that I have much of a choice. Anyway, that's pretty much it except for the body aside from cleaning up some mistakes, sanding and finishing.

Thursday, May 3, 2007

Polishing Frets

I mentioned in an earlier post about having a StewMac fretting toolkit of which I only used a few pieces. What I've done w/ this so far is crown and level the frets on two of my guitars. One of the things that was appealing about the toolkit was that it came w/ this book, Fret Work Step By Step by Dan Erlewine. Now you would think that since the book was included w/ the kit, that the examples in the book would be easy to follow using the tools in the kit. However, this is strictly not the case and because of that I am still somewhat irked at StewMac and have since tried to avoid doing business w/ them. Their stuff tends to be too expensive for a hobbyist anyway, in my opinion, even though it is of the highest quality.

What I use to do this out of the kit is the six inch fret leveling file and the double edge fret file. My procedure for leveling the frets is to color in the top of the frets w/ a felt tip pen and then run the fret leveling file parallel to the center of the fretboard (it goes over the edges a little bit near the nut since fretboards are tapered) until the marker is gone from all the frets. Then I re-marker the frets and crown them using the double edge fret file.

I've done this on two guitars and it has made them both play much better. I've gotten the action lower w/o any string buzz. The only problem is that the process leaves a bunch of chatter on the top of the frets which the strings scratch against when bending. On the second guitar I did, I was aware of this and polished the frets w/ 0000 steel wool, which helped a lot. The first one is all kinds of messed up though and I decided I would have a go at those frets again to see if I couldn't get them cleaned up. (I would assume this is what some of the other tools in the kit are for but I've been unable to ascertain their proper usage. Maybe I'm just dumb, I don't know.)

I decided to bust out my cheapo Dremel knock-off on them. Safety first:


I'm wearing the goggles so that I don't suffer cruel paper-cuts to the eyeball from the green tape when I mask the fretboard:


A lot of people like to mask the frets one at a time but I figure it's easier just to do the whole thing all at once to get the boring stuff over w/. I just use masking tape for this and it's never been a problem. Some people recommend not using tape on maple fret boards. I don't know how important this is but I thought I'd pass that along for those who might want to try this at home. Once that was done I went after them w/ the steel wire brush attachment for my Dremel:


I just took it along the length of each fret until it looked like I got most of the scratches out, keeping it moving constantly. I reckon this got it at least as smooth as polishing w/ the steel wool. I then took it and, using a polishing tip I got at my local home mega home supply warehouse and lumberyard, I polished each one further w/ some Dremel rubbing compound:

Dip the tip:


And rub it down:


This, I think got it a little bit better. The improvement is noticeable but unfortunately this whole process still hasn't completely removed all the scratches. It's at the point where it doesn't bother me in the least when I play it but, honestly, I would be embarrassed to show it to a real luthier (unless asking for advice) and certainly I wouldn't want to sell it w/o warning the buyer of the scratches. Next time I change strings, I think I'll try some sandpaper or something or maybe just go at them w/ this process again. Perhaps I will even figure out how to use the rest of the tools in that toolkit. There is a learning curve to all of this and I am advancing along it slowly but surely.

Anyway, here is the guitar I did this all on. Introducing the Detonator:


It's a Peavey that I got when I was about fourteen and still a fine guitar despite having to put up w/ me for these last eleven years. The model name is Detonator and I couldn't resist replacing the bridge pickup w/ a Duncan Designed pickup by the same name. (What Squire is to Fender, Duncan Designed is to Seymour Duncan.) This is actually the first "good" guitar I got and it fell into sad disrepair after many years of abuse at my young hands. Eventually, I got sick of it sitting in its case and decided to bring it back to life, which is actually what got me into working on my own guitars (that and the high expense of taking it to the pros). I took it apart, sanded off the finish, prepped it and had my friend spray it w/ jet black automotive paint (does not negatively affect tone, don't listen to the naysayers). The pickguard was originally white but I just sprayed it w/ matte black spay paint (along w/ the pickup covers), which has held up much better than I expected. I janked up the holes for the controls pretty bad so each one has a great big washer underneath it to cover that up. It's hard to see in the picture but in between the two knobs is a coil splitter for the humbucker which gives me bona fide strat-type bridge tones in addition to the humbucker sound. Very versatile and the neck plays like a dream, very slender w/ a wide, flat fretboard.