Well, if you're anything like me, every now and again you just gotta get your best scratchy cough out and call into work so you can take the day off to build guitars in your back yard. I did that yesterday and, let me tell you, it's a hell of a good feeling. Not gonna let the man hold me down. (Who's w/ me!?) My task for the day was to get a couple templates done for a couple elements of my next guitar. Last time, I made the mistake of building all of these things into the template for the guitar. This is very convenient for one project but makes it a little more troublesome when you move onto the next shape and have to do everything all over again. This time, I'm made each element on a different piece of mdf for greater versatility.
The two pieces I made were for a humbucker rout and for a tele-style neck pocket. These will be common elements on guitars I make in the future so this will equal a lot of time saved. I made these on quarter inch mdf this time. Last time, I used three quarter inch and it was a beast to shape and very frustrating to get accurate.
The first step is to draw everything out very carefully w/ a straight edge and a carpeneters square. I got the measurements I needed from various places online. This took me about an hour and half. For the last project I didn't have this kind of patience but now that I know I can pull it off, it's easier to reach down into the depths of my psyche to find another five minutes of attention span to erase a line and redraw more accurately.
This is the neck pocket:
I made the top of it extend an inch longer than it had to be. Hopefully, this will give the router something better to rest on when I use it so I can better control it. There's lines drawn so I can get it in the right place.
Same deal w/ the humbucker routt:
Ultimately, it was a mistake to cut it out so small, at least before I had the middle cut out. It made it really hard to clamp down as I worked on it:
It was too small for me to use a jigsaw so I had to use a coping saw. As seen in the picture above, I drilled out the corners w/ a handbill so I could turn the blade. The initial cut was none to accurate:
But some time w/ a file got it in good shape pretty quickly (I actually filed it a bit more from this point and it looks very clean now):
Same deal w/ the neck pocket only this time I could use the jigsaw to save time (and I'm actually more accurate w/ that than a coping saw). It is nearly perfect:
This all came together a lot quicker and better than previous efforts so I'm pretty pleased. The only problem w/ using the quarter inch thick mdf is it's really too thin to use directly on a guitar so I will need this to make some thicker templates. It's worth the extra effort for the added accuracy.
Tuesday, November 6, 2007
Monday, October 29, 2007
Shaping and Scraping
Ok... My camera is giving me shit so if you're just here for the pics, this is all you get:
So there you have it. That's the body of the cheapo guitar cut to shape and routed. I used pretty much the same method as I did on the baritone body. The only difference is this time I frakked up the glue joint between the two pieces of wood so the top of the thing wasn't quite level so before I started I put some eighty grit paper on my random orbital sander and whirred it across the top and back a few times. Worked like a charm. I used the same template as I used for the baritone body. I like it and just can't think of anything better.
First thing I did was trace the outline on the body and do a rough cut w/ my jigsaw. Last time I tried to use a smooth cutting blade and get as close as possible, which worked OK. This time, I just went ahead and used a fast cutting blade and stayed about a half inch outside of the line. If anything, this method left me w/ less wood to cut away during routing--and it must have saved me fifteen minutes or a half hour w/ the jigsaw. Of course, it could have just been the fact that I have greater and more substantial jigsaw skill now but I really do think this was the better method of doing the rough cut and will continue to use it in the future.
After that, it was a simple matter of routing. I set up my template follower to cut a sixteenth of an inch outside the line and am glad I did. There was a little bit of tear out but, unlike last time, I left some extra wood. Once I was done routing, I just took my trusty random orbital sander and sanded down to the line.
So far, I must say this is head and shoulders above the first one and I think I'm gonna buy a nicer neck than I originally planned. I like the kinda weird streaks on the cheapo alder I'm using and I think this one will be nice enough just to finish w/ a couple or five clear coats. I'm thinking I will get a tele-style neck w/ a maple fingerboard and it will look really simple and classy. Probably go w/ chrome hardware and chrome-covered humbuckers. The only weird thing is it's gonna have about six knobs because of the electronics I'm gonna cram in there.
Thursday, October 25, 2007
Gluing Up a Blank
For some reason, I never seem to get around to working on my new project, the cheapo guitar. It is mostly laziness combined w/ the fact that I have a new band started up which takes a great deal of my time. Also, it's fall now so by the time I've relaxed for an hour after work, it's already getting dark and I'm not keen on using power tools w/o proper illumination. However, I did finally get around to gluing up the body blank, which is a relatively simple process.
First thing, the two pieces of alder I bought off the world's most famous auction website had roughly sawed edges that needed to be straightened to be jointed so I could glue them. Originally, I had planned on using a router table for this but, alas, the one I got off that same auction site is the right kind for my router--thought I had a great bargain on it too. Instead, I used a hand plane, which is a fun tool that makes fun, long shavings:
Having never used one of these bad boys in the past, I spent about twenty minutes fixing the mistakes during the first five minutes. Nevertheless, I managed to get it pretty well straight. I checked my progress continually throughout this process w/ a straight edge to make sure I was keeping it real.
Then I put a generous amount of wood glue on there. The brand I chose was Titebond but only because Elmer's (which should work just fine) seemed to commonplace for use in luthiery. Plus, I was pretty damn certain that I wanted it bonded tite-ly.
For some reason, I always think wood glue looks delicious, like a vanilla milkshake:
After I got the two pieces together, it was just a matter of clamping things up and wiping off the excess glue:
Unfortunately, I wiped too much excess glue off and actually manage to suck some out of the joint w/ a paper towel. Just a little but once it was dry, I squeezed some more glue in there to fill up the crack:
Now it is right as rain and feels completely sturdy, like it's a solid piece of wood. Unfortunately, I didn't quite get the two pieces of wood completely even. That is something I'm going to be able to hopefully deal w/ this weekend.
Tuesday, October 16, 2007
A New Engine for the Hollowbody
A while back I found a really cool Ibanez Artcore hollowbody guitar on clearance at my local guitar warehouse of super proportions. It only cost two hundred bucks so I bought it on the spot and have regretted the descision exactly never. It is a fine looking, great playing and decent sounding guitar. The only problem was the stock pickups were about as flat as your back. Of course, I will not let such things stand in my house so I set about changing them. Ultimately, I chose to use some GFS Retrotrons I had laying about. I originally had them in the SGeezus but found them a bit to chimey for the inherantly dark sound of that guitar but they seemed a perfect fit for the hollowbody. At the very least, I figured, they wouldn't be so dull sounding. I also wanted to try out a super fancy RS Guitarworks wiring harness so I figured I'd give that a go too. Let me tell you, replacing the pickups in a hollowbody is as harrowing an adventure as you could imagine.
First, I took the thing apart:
And already my first surprise! The bridge isn't attached to the body in anyway aside from the pressure from the strings. OK. I guess I will just have to put it back on. These are the original electronics:
As you can see, the pickup selecter switch is weird and cheap looking and the pots are teeny tiny. They weren't problematical but I felt there was a very high chance of failure. I will give Ibanez this: they were at least the correct values. A lot of times in cheap guitars they'll just use whatever's cheap. No 100K volume pots here.
The next step was wiring up the harness. I had a bit of frustration w/ this and didn't end up taking any pictures. Sorry. It turns out my trouble was the tip of my soldering iron was just old so I replaced it. No big deal. It also helped to use a little extra flux. I got some that was safe for electronics work in a little tin from a giant electronics chain.
Next was the hard part: getting the harness in there. Lord. This experience was so harrowing I don't even want to think about it. You gotta work through the pickup slots and the F-holes the whole time. I have big lardo mega fingers so this was not easy. You pull the pots and other components through w/ string (I used thread, doubled up) and it is even more difficult than you'd expect. The whole thing was a mess:
Eventually, I got 'em in though and it was honestly thrilling to finally be done w/ it. It took me over a week whereas it takes me maybe two hours to wire up a regular electric guitar. I must say the new pickups are really sharp:
As mentioned, they are GFS Retrotrons. Specifically, the bridge is a Hot Liverpool and the neck is a regular Liverpool. They are modeled after the old FilterTron pickups like you might see in a Gretsch. It's at least a distinctive look where people can tell it's customized right away. The sound of them is exactly as hoped--very clear, bright but still smooth. It's brought new life to the guitar. The RS Guitarworks harness works well too. The volume knobs especially are much more usefull. The guitar doesn't get all kinds of dull sounding when you turn them down.
And here she is in her entirety, not bad for $200 and some pickups I had lying around:
Sunday, September 2, 2007
SGeezuz is Risen!
For some time now my SG Special Faded (2002-ish w/ the half moon inlays, too cool for words) has been in some sorry shape. It just sounded dull. Imagine you have the deadest strings you've ever had in your life only worse. Even brand new strings would sound bright but there'd be this weird undercurrent of mud. I couldn't figure it out. I swapped in two different sets of pickups and dropped in a replacement bridge and it sounded different, maybe better, but there was still a general problem w/ the overall sound. Eventually, I narrowed it down to the bridge posts. This had been my one workhorse guitar for many, many years and over time my sweat had actually weakened the wood around the original posts. As you can see here, especially on the bottom, it is pretty gross:
(Also, you can see the GFS Crusader pickup I have in the bridge there. Great sounding pickup. Judging by the appearance it is meant to be a Duncan Invader clone and I guess it is pretty close in terms of output but maybe it's not quite a snarly and a little warmer sounding.)
Now since the wood surrounding the posts was the problem, I was either going to have to drill them out and dowel them or find a bridge w/ larger posts. I opted for the later. The bridge I used is a Gotoh tune-o-matic:
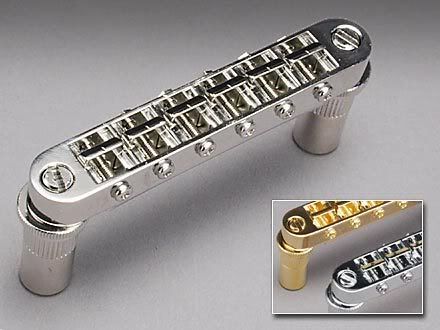
As you can see, they mount on big bushings almost like a wraparound bridge. Some people don't like Gotoh hardware but I think they're nuts. I have some Gotoh mini tuners on my baritone and I think they're as good as anything. I think they get a bad name because they're more of a budget brand but, honestly, they're made in Japan and I doubt many humans on this planet could tell the difference between their stuff and, say, Schaller in a practical setting (not to say that the Schaller aren't made better--I don't know one way or the other).
The installation of this is simple (though it took a good deal of web searching for me to be satisfied that I knew what I was doing). You just drill holes and tap 'em in w/ a mallet. It's that simple. I wanted to use an 11 mm bit but my local orange warehouse of overpriced tools didn't have metric bits. I settled for 7/16 inch. Since my drill press isn't large enough to drill tune-o-matic posts, I made a little guide out of some scrap MDF. To judge my depth I used a piece of masking tape, which always works like a charm.
As you can see, there' s not much marine of error between he depth I needed for the bushings and the thin SG body:
I very carefully drilled through a piece of masking tape. (The tape keeps the finish from chipping--not a big deal on this guitar.) It worked well enough:
I pressed in the bushings w/ my fingers and then gave 'em a few good whacks w/ a rubber mallet for good measure. I'm not sure if this is the right way to go about things but it feel sturdy to me. The holes in the pick guard weren't big enough for the bushings so I routed it out to fit them. Kinda got a little wild w/ it so it's not pretty:
Fortunately, this is mostly covered by the bridge posts once it's fully installed. It also so happens that the tops of the bushings are just about flush w/ the pickguard.
W/ that taken care of, I decided I might as well change out the tuners while I was at it. I had some Planet Waves auto-trimmers on there for a couple years and while I like 'em OK, I could never really get used to them. Also, I lost a piece of one of them so I had to put on of the original Gibson tuners on there, which looked kinda cool in a used and abused kinda way:
I liked the look of the stock Gibsons but I thought I might try something else just because so I got some Grover keystone style ones that looked the same but hopefully are a bit higher quality. These are a cinch to swap out. Unscrew the nut on top w/ a wrench and and take out the screws on the back. Do the reverse to get the new ones on. Voila!
And there she is, the SGeezus. I need to give it a couple days to be sure but as of now it's looking like the new bridge fixed her right up. Since I detune two and a half steps down, the intonation is a little off (always the case w/ tune-o-matic bridges) but the sound is much, much clearer now.
Thursday, August 30, 2007
No Hot Luthiery Action
Sorry folks. I've been sidetracked. Took a wonderful vacation w/ my wonderful girlfriend, rented a practice space and took another wonderful vacation w/ my wonderful friends. During the minimal amount of time I've spent working on the three piece neck project, I've realized a) it needed to be expanded to a five piece neck to be wide enough and b) I have no clue how to go about building a guitar neck and am not quite good enough to wing it.
So....
New project! The cheapo guitar.
I have an alder body blank I purchased off eBay for twenty bucks so that's in. Next I'm gonna get a cheapo neck from wherever the hell I can. I have some pickups that I'm taking out of my SG pretty soon that can go in there, some cheap hardware and then I think I'm shove the guts of an old Big Muff or some such thing in there. I will use this guitar to slay peasants.
Tuesday, July 3, 2007
Baritone Body - Project Overview
This is my first project. My task was to build a new body to use w/ a Warmoth baritone neck that I originally had on a MiM Fender Telecaster. The pickups are Mighty Mite p90s, which I can turn on and off w/ push/pull pots. Another push/pull pot allows me to switch the guitar into stereo.
Here are the posts, in chronological order:
Baritone Body
The Most Unsmoothest Cut
Rough Cuts on the Templates
Some Sanding
Neck Pocketing
The Pickups
Further Neck Pocketing
Routing--Stage One
Routing--Stage Two
Routing--Stage Three
Finishing the Templates (Finally)
Routing--Stage Four
Four Holes in the Neck
Neck Holes, Bridge Holes and Jack Holes Too
The Hall of Shame
Stained and Confused
A Less Painful Stain
Staining Update
Stained, Not Cleared.
Harnessing Up - Part One
Force Shields
Harnessing Up - Part Two
I'd Be Finished If I Didn't Screw Everything Up
The Flood and the Fixes
The Un-Baritone Body
Overall, I count the project as a success. Definitely a first attempt but none of the errors I made make it any less fun to play and I'm assuming they have at most a minimum impact on the sound. Nevertheless, here is what I will do differently next time:
Update:
As you may have seen in the Un-Baritone Body post, I have changed the neck to a cheaper one simply because I thought I could do better. I still may fix it up but as of now, I'm not wasting any money w/ new pickups even though I still really want to try those Toneriders.
Here are the posts, in chronological order:
Baritone Body
The Most Unsmoothest Cut
Rough Cuts on the Templates
Some Sanding
Neck Pocketing
The Pickups
Further Neck Pocketing
Routing--Stage One
Routing--Stage Two
Routing--Stage Three
Finishing the Templates (Finally)
Routing--Stage Four
Four Holes in the Neck
Neck Holes, Bridge Holes and Jack Holes Too
The Hall of Shame
Stained and Confused
A Less Painful Stain
Staining Update
Stained, Not Cleared.
Harnessing Up - Part One
Force Shields
Harnessing Up - Part Two
I'd Be Finished If I Didn't Screw Everything Up
The Flood and the Fixes
The Un-Baritone Body
Overall, I count the project as a success. Definitely a first attempt but none of the errors I made make it any less fun to play and I'm assuming they have at most a minimum impact on the sound. Nevertheless, here is what I will do differently next time:
- Make a better template for the neck pocket. Just gotta be a little more patient. I spent plenty of time on this one but I rushed it.
- Make templates for individual parts--one for the neck pocket, one for the pickup, one for the control cavity, etc.. Goes right along w/ the first one. These things take a long time to build so it will be nice to have ones for, say, p90s that aren't part of the guitar template so I don't have to be ever remaking them.
- Not use the one step stain and finish. I will spend more time finding the right color of stain. The combo stain/finish was really hard to deal w/ on a guitar while the wipe-on finish applied like a dream.
- Be more careful w/ the control cavity spacing. Seriously. This one was so tight it makes working on it miserable. I will also probably use thinner hookup wire. The stuff I was using was overkill and made my life even harder. The stuff didn't want to bend into place at all.
- Redo wiring to include a pickup selector switch. I will tell you what, those push/pull pots seemed like a nice clean design but they are pretty much impossible to switch on the fly.
- New pickups. These Tonerider p90s look freakin' rad. I'm pretty excited to get these ones in, actually.
- Probably shim the edges of the neck pocket just to get a little better stability. (It's not a problem really but it never hurts to try an improvement.)
Update:
As you may have seen in the Un-Baritone Body post, I have changed the neck to a cheaper one simply because I thought I could do better. I still may fix it up but as of now, I'm not wasting any money w/ new pickups even though I still really want to try those Toneriders.
Monday, July 2, 2007
The Flood and the Fixes
Excuse my lack of posts lately. I got sidetracked due to flooding in my apartment. Some say it was an act of God. I don't know about all that but I can say whoever flooded my appartment can go fuck themselves. Here's a look at some of my tools to give you an idea of what I've been dealing w/:
Oh yeah--good times. I got it all squared away down here to the point where it's actually cleaner than when I started (which wasn't all that clean, admittedly) so I'm finally getting to finishing this project up.
The first step to moving the bridge over is filling the old holes, which is pretty simple. I first drilled them out a bit w/ a hand drill and then I glued some dowels in there w/ wood glue (I just used Titebond; I'm not sure it's the best but that's what I used):
I trimmed of the excess w/ a pair of end cutters:
I then used a grinder bit w/ my dremel to get them down as close to flush as possible. Placing the bridge in approximately the same place as it would be going, I saw that this whole repair would be covered by the bridge so I didn't bother touching up the finish. Maybe I should have but I didn't:
At this point, I redrilled the holes using the same method I drilled them w/ the first time (piece of tape as a depth guide on a hand drill). The "careful measurement" method failed me the first time so this time I used the "eyeballin' it" method to place the bridge. Worked a lot better in this case but I'm gonna figure out how to do it the right way in the future.
Before I put the bridge on, I took the chance to replace the screws I had the p90s in w/ ones of the proper length. It looks much better now:
Then it was just a matter of screwing the bridge on, stringing it up and making some slight adjustments to saddle height and intonation to get it playing well. Looks better than ever:
Getting the bridge pickups at the right height made a huge difference in tone. This thing sounds pretty great even w/ the cheapo twenty dollar pickups so I must've done something right. In the next couple days, I'm gonna take this out in the yard and get some nicer pictures of it and also try to do some sort of summary of the whole project. Until then, I think I'm just gonna enjoy it.
Monday, June 25, 2007
I'd Be Finished If I Didn't Screw Everything Up
Well--it's about time I start wrapping this up. I've had a good half dozen layers of poly finish on there for over a week and it seems to have been about as hard and dry as it can get for a good couple of days so it's time I start putting the thing together. At this point in the process, I'm so excited that every minor set back sends me off on screaming rampages throughout my apartment and the surrounding neighborhood. However, it is all working out slowly but surely despite various troubles.
The first thing I had to take care of was the strap buttons. It just slipped my mind entirely to drill them before I started finishing. It was an easy enough situation to rectify. I just put some green masking tape over where I wanted to be (to minimize chipping of the finish) and drilled the holes w/ my hand drill like so:
I did get a tiny amount of tear-out but it was easily covered by the strap buttons and hardly noticeable anyway. I also had to redrill some of the holes for mounting the bridge and mounting the neck as they'd gotten a little gunked up w/ finish--no big deal.
The controls in this were rather close together and it really caused me a hell of a lot of trouble trying to stuff it all into the control cavity. I had to resolder a couple things here in there to fit it all in. The end result works but it's ugly. I'm almost embarrassed to post a picture of it but I will because it's funny:
OK. Not that funny but you have to admit that's about as ugly as it gets as far as guitar wiring goes. Anyway, once I had that taken care of, it was a snap to put the rest of it put together, aside from a few things I noticed that I'll get to in a second.
She looks real nice though:
Once I finish fixing the problems I describe below, I will take her outside and take some pictures in the yard where the sunlight is nice. Then me an my homemade guitar will sit together drinking beer and grilling burgers all afternoon--heaven on earth if you ask me.
The first and most agrivating problem is I lost the screws to install the p90s. This is what made me have a fit. I know they're around somewhere but whether that's in my toolbox or some landfill I will never know. I gave up after an hour of looking and went to my local super depot of orange colored home tools and duct tape to buy something to stand in. Not to my surprise, they didn't have p90 mounting screws. The closed thing I could get were some number four screws but they were only an inch long and need to be more like an inch and a half. This left me w/ not much room for adjustment. Indeed, practically none. Here are the pickups at their maximum height:
There's also a nice shot of the goods for those who are interested what my crotch looks like. It's only a little bit too low but I really spend a lot of time adjusting pickup height and getting it just so (doing this makes a bigger difference in your overall tone than buying more expensive pickups, in my opinion) so it's a bummer not to be able to adjust them, especially since the volumes between the two aren't really well balanced at all. Plus, it just looks funny and I can't have that.
Worse than that but somehow less aggravating is I didn't get the bridge on there quite straight. If you'll notice, there's a lot more room between the edge of the fretboard and the string on the bass side of the fretboard (left in this picture) than the treble. It disgusts me to the very core of my being (you can also see the brass Phillips head screws I used instead of the p90 screws):
Actually, it plays just fine aside from the highest string feeling a little weird but it really irritates me to look at it so I'm going to remount the bridge so it's all straight. The setup right now is somewhat cursory but it really does sound pretty darn good--especially the neck pickup--and feels nice to play overall. In fact, I like it so much that I've changed my mind and decided to keep the baritone neck on this one and build a new body once I've finished my neck (or more likely right along side it).
Thursday, June 21, 2007
The Three Piece Neck
Edit: This project is no more. It has morphed into a five piece neck and put on hold until I know what in the hell I'm doing.
W/ my first body almost finished, I decided to embark upon a new project. While the first body looks pretty nice, it is definitely a first effort and really about ten or fifteen steps below the Warmoth baritone neck I'm putting on it so I decided to make a new neck to put on it. This was my first, messed up body will find a good companion w/ my first messed up neck. It's almost poetic in a way. I'm going to build a new body for the baritone neck later.
This is gonna be a little ambitious for a first go but hopefully that just means I will learn a lot more and not that I will make a ton of mistakes and ruin perfectly good wood. I'm going for a three piece neck w/ an angled headstock. It's extra work but it will be fun. The fingerboard will probably be ebony and I think I'm gonna end up buying one pre-made for this one. It might be more interesting to try to do it myself but I'm on a budget here and I'd rather not splurge for the new tools all at once.
So far, all of I've done is the easy part, which is spend money on wood. I went w/ padoauk and maple. The contrast between the reddish brown of the padoauk and the near white color of the maple is quite striking and I think it will make for a very handsome neck in the end. Here it is:
From here, I don't know what the hell I'm gonna do. I figure I gotta glue it together and then do some other stuff and more stuff after that until the thing is a guitar neck.
Saturday, June 16, 2007
Harnessing Up - Part Two
The multimeter is more powerful than the very hand of God when it comes to trying to figure out what in the hell is wrong w/ the wiring harness for your baritone guitar. In all other things, the very hand of God is more powerful but in this one isolated case, the multimeter wins out. Here is mine in action (or right before or right after action, I forget):
Basically, all I use it for is a continuity tester to figure out what circuits are being formed when the switches are in various places and for this it works quite well (I also use it to double check that I haven't burned out any pots or switches by overheating them w/ the soldering iron). It turns out the mistakes I made were pretty minor and one mistake was actually the right thing to do in disguise. I temporarily soldered some the pickups on there so I could plug it into an amp and test it. Actually plugging the thing into an amp can be a big help. Sometimes, the multimeter will just pick it up as a break in the circuit but when you have it plugged in, you will hear the sound cutting in an out so you know it's just a cold solder joint or an otherwise weak connection. I ended up fixing some of the grounding and moving some stuff around to avoid short circuits and crossed wires. It is not the prettiest wiring job I've ever done but it works and it should be small enough to fit right in:
I think this is the first time I've ever wired up a guitar w/o getting at least one burn that blisters, which is pretty amazing as absent minded as I can be when I'm frustrated. The only thing that I'm not pleased w/ is that I couldn't get the solder to stick well to the back of the pot I'm grounding everything to so I ended up just grounding all the wires together and then grounding the back of the pot to that. The rest of the stuff will hopefully be grounded by the foil shielding in the control cavity. If not, I've got some more work to do later but I will worry about that when the time comes.
Thursday, June 14, 2007
Force Shields
Oh man, it was funny as hell when I went to RadioShack to see if they had copper shielding tape. The guy was like, "Uhhhhh... Here's some electrical tape. We have copper wire." Brilliant!
I just went to the great orange land of home supplies and got some aluminum foil tape like you might use for taping together duct work. The way I see it, it's metal and therefor it must be good. I doubt I will be able to solder anything to it so we'll have to wait and see if it actually works in the end.
The tape on the front is just regular:
But the back glows like an orb due to the radiation treatment I gave it in my secret lab:
I used the cheapest stuff they had which was really thin so there's a couple layers. I'm probably gonna try to finagle some sort of way to attach wires to them so the stuff in the pickup cavities especially might actually do something other than look pretty. I'm also gonna poke some holes in it so I can, you know, assemble the guitar and stuff.
Tuesday, June 12, 2007
Harnessing Up - Part One
The wait in between coats gets me a good chance to wire up the harness for all the electronics in there. I'm not sure what everything does but I can tell you I've figured out one or two effective ways of directing small electrical pulses from the guitar pickup, through some controls and into a cable which I've hopefully managed to connect to an amplifier (not always the case though). Of course, this time I decided to do something strange to ensure I'd have a host of problems w/ this simple task. For starters, I'm making this a stereo guitar, which means that you can send each pickup to a separate amp. Some people do this using a stereo jack but I, being a crazy fellow, decided to put to go w/ two mono-jacks so I wouldn't have to worry about having stereo cables and a way to split the signal from them. Stereo mode is switchable so I can run it like a normal guitar and flip a switch to split the pickups between the two outputs. Also, instead of having an ordinary pickup selector, I'm making this so I can turn either pickup on or off w/ a switch. Each pickup has it's own volume and tone control and the switching is all done by push/pull pots, keeping the control layout clean and simple despite the advanced and amazing technology behind it all.
The first step of wiring all this stuff up is labeling all the pieces and laying it out in something like the order it's gonna be in when I'm done:
This is one of those things that people tell you to do and but you don't at first because you think it's a load of crap but it really does make things go a bit smoother. I label all the pots w/ a marker so I know what does what and put a little piece of tape on the back of the control cavity cover that tells me what color of wire is for what so I can remember if I ever have to open the guitar up to fix it or change the pickups (and I will). I also try to strip enough pieces of wire so I don't have to stop soldering every four seconds to strip another piece of wire. Of course, even if I spent several hours beforehand stripping wires, I'd still be about ten pieces short as the need for more wires tends to increase as you strip more of them. (This is actually explained by Heisenberg's uncertainty principle but I don't have time to be getting into Schroedinger's Cat and so forth and it doesn't make any sense anyway.) It's also a good idea to clean all contacts w/ some steel wool even though steel wool feels really weird on the fingers and you hate it.
While I was doing all this, I found time to make some pizza, which I then ate:
Fully delicious. There's nothing that gets me more in the soldering mindset than pizza so I got ready and had at it. Remember folks, hot solder can splatter and cause severe bodily harm, especially to the eyeballs so, as always, safety first!
W/o eye protection it would have been really stupid to be waving the soldering iron like this and there's no way I would have lost less than one eyeball. Instead, I survived to solder for a half hour or so before I realized I messed up my design big time. And I think the reason why is obvious from this picture:
OK. Well--I doubt you can tell a single thing from that mess. Basically, I wired it in such a way that if I had both pickups turned off, the amp would hum as if the cable's not plugged into anything, which is no good in high-volume situations. Anyway, I've had enough for now. I'm gonna have at this son of a bitch w/ a multi-meter and a keen sense of logic in the next couple days. Until then, I will just have to be satisfied w/ nothing since it doesn't work.
Stained, Not Cleared.
I have finally reached the combination of sick and tired of applying more coats of stain and pleased enough w/ how it looks finally that I'm going to start clear coating this sorry son of a bitch. As it is now, it needs a little work w/ some fine steel wool and maybe some sandpaper but it's good enough for me. The pictures look a little more purple here than in real life but I think this gives you a pretty good feel for the final color.
The front:
The back:
And that's all there is too it. I'm gonna put three or a half dozen coats of clear on it to get it nice and shiny, let it cure for a while and slap the thing together as soon as I can. The clear is mostly just to protect to wood but there's been enough scratches and other errors produced by my poor handling of the finishing process that it's really more to practice applying it than anything. It makes it look nice and shiny too, which makes my food taste better when I eat off of it.
Saturday, June 9, 2007
Staining Update
It's all been coming along quite well but there's really no new pictures or techniques being used to merit a full post. I've just been repeating the sand, clean and stain process and it's gradually getting to the point where I can live w/ it. The color is quite nice but I think getting it completely even is a pipe dream. I'm not worried. I kinda like it that way.
Thursday, June 7, 2007
A Less Painful Stain
I cleaned up the streaky mess I made on my guitar a couple days ago using 100 grit sandpaper and then worked my way back up to sanding it w/ 400 grit. I wiped off the dust w/ mineral spirits and it's looking quite a lot better now:
The hanging thing obviously wasn't working for me so I'm just setting it down and doing one side at a time. Oddly enough, the back looks better this time around:
The front doesn't look half bad though:
My strategy at this point is to keep adding layers until most of my mistakes aren't too noticable. For now, in between layers, I am evening things out w/ 4oo grit sandpaper on a block but I'm going to switch to 0000 steel wool once I get things a little better. Once that's done w/, I'm gonna give it a couple or a half-dozen coats of the wipe on poly to get it nice and shiny and then I'm thinking I might go w/ a wax coat on top of it.
Next time, I am going to use a regular stain and then just finish it w/ the wipe on poly if I don't spray it. The combination stain/finish has really proven to be a pain. Regular stain and the wipe on finish are both easy to get on in thin and even coats but the combination seems to like to glop up a little. If I were finishing a railing, I wouldn't worry about it but hopefully, this will be a bit more musical in the end. Oh well--I suppose that's how you learn.
Tuesday, June 5, 2007
Stained and Confused
Finishing guitars is an artform in and of itself and a task to master on its own w/o having to worry about all the other aspects of guitar building. As w/ the rest of this project thus far, I'm pretty much jumping in head first and seeing what happens. In an uncharacteristic burst of forethought though, I did test several finishes out on scrap before hand to see what looked best:
The one I went w/ is in the very upper right. It is a MinwaxPolyshade finish coated w/ another couple of coats of a Minwax wipe-on gloss poly finish. The color is called Bombay mahogany and it really does look fantastic. It's not a perfectly smooth, mirror-like finish like you normally see on guitars because I did nothing to fill the grain but it has a beautiful hand-rubbed luster that gives it a real quality but still homemade kind of look.
The rig I'm using here (which is at the home of one of the most famous artists in Chicago) is just a bunch of coat hangers through the neck holes on a wooden bar I put across a couple odds and ends:
I had it hanging because every picture I've seen of people finishing guitars has it hanging. Unfortunately, the difference between when they did and what I'm trying to do is they're spraying and I'm brushing. Consequently, the body kind of swung around as I tried to put the finish on and I'd have to steady it as best I could by holding onto the coat hangers up top w/ my free hand (which didn't work very well):
This stuff is a combo stain/finish and before I applied it, I sanded it down to 400 grit, cleaned it w/ mineral spirits to get all the dust off and applied some pre-stain conditioner which is supposed to help the stain absorb more evenly. It worked OK on the front (and I do still really like the color):
But the back is streaky as a all get out:
I ended up deciding to sand it down and I'm going to have to redo it:
I think that ultimately, I'm just gonna end up making the back and the sides somewhat darker than the front. I think it will look pretty good regardless. I'm going to try to blend it into sort of a ghetto sunburst w/ the front. I'm sure there will be worse looking guitars in the world.