Tuesday, May 13, 2008

Sunn Concert Bass

Recently, through of inquiries over the internets and train rides to and from the south suburbs, I acquired a Sunn Concert Bass free of charge from a gentleman named Tariq who plays in the excellent south of Chicago metal band Couldron, who are looking for a new drummer at the minute should you happen to be one. The only caveat was that it was in non-working order. Some asshole had apparently decided it would be a good idea to let the magic smoke that typically resides in capacitors, transistors, diodes and other such enigmatic electronical elements into the outside world where we all know it should not be. My task was to put it back in there.

I live my life car-free so it is often a trial to get out to the 'burbs. I knew it was worth it though as soon as I set this magnificent bastard on my speaker cab at home:


Looks pretty sweet, don't you think? How'd it sound? Well, at this point, it was still broken so it sounded like crap. I was hopping that the magic smoke may have found it's way back in there on its own but, sadly, that was not the case. Guitar sound would come out of the amp but not much and a ton of buzz came w/ it. Obviously not the best situation.

I opened it up to see what was up. Bear in mind, I followed the proper safety procedure of not being a retard before I started probing around. If you are a retard, I recommend you not open any amps up.

These are the amp guts:


At this point, I realized that somebody had actually tried to put some kind of magic smoke back in there. I can't say what kind but, seriously, this thing utterly reeked of nag champa incense, leading me to suspect that it'd been tampered w/ by a hippy at some point.

Closer inspection lead me to my first clue, two burned out resistors:


Even though I knew it wouldn't work, I tried swapping out those two resistors. The only good thing to report here is that only one of the resistors burned up this time. Apparently, the other one had just been taken out by the first one. I was one resistor down now but at least I had something to show for it. I replaced the one that burned up again and set off about the internets to find the real source of my problem. After some research, guided by several fine gentleman on the Unofficial Sunn Musical Equipment Web Site, I managed to narrow down the source of my problems to a few transistors in the power section. I am not sure if this is normal but they are stuck to the back of this amp and covered w/ little plastic pieces:

You just have to unscrew the screws and they pop right in and out, no soldering required. I tested them using a multimeter and the method described on this page. Three of them were bad out of five. Good thing I ordered four. Once replaced, it fired up just fine. It's loud as balls and your mom keeps calling me to ask about it. I've had it down at my band Sun Splitter's practice space for a couple weeks now and it's still going strong. Sounds pretty good for guitar or bass but I use it w/ my drum machine, Sober Bill. Here's the full rig:


As I said it's been going strong for a while now and I'm happy w/ it but I posted some pics of the board on the Sunn forum and someone noticed that a couple electrolytic capacitors had leaked out some of the crazy capacitor juice that's inside of them. I am OK w/ this since it works anyway but they're telling me that those caps could short at anytime--leading possibly to total protonic reversal--so I'm gonna replace them pretty soon. There's also some old resistors in there that I want to replace as some have drifted pretty significantly over the years. I will, of course, keep you posted.

Monday, May 12, 2008

The Un-Baritone Guitar

So I had to come to terms w/ something about my baritone guitar: It was cool, it sounded and played OK but I just needed to accept the fact that it is simply not that great. It's a nice first try but that is all I can say about it. I've decided that it is not worthy of my beautiful Warmoth neck so I've replaced it w/ a dirt cheap no-name neck from eBay. It's a load off my mind saying that out loud.

And I'm not kidding when I say no-name. It literally doesn't have a brand name at all on it's vaguely Telecaster-ish headstock:


I have no problem w/ the lack of name-brand and, in fact, I appreciate not having to shill for whatever company imported this son-of-a-bitch from French Indochina. What I do have a problem w/ is the fact that the holes were drilled in the wrong damn place. Not only that, they are too big for a normal neck screw. I filled them in w/dowels and re-drilled them, no problem. It actually fit in the neck pocket better than the Warmoth neck because it was too big.

Of course, that could not possibly be the end of my problems w/ this thing. The fact that it fit better, meant I got it on there straighter which made it a apparent that the bridge was in the wrong place so I had to move it again using this same procedure. And if that was the end of things, I'd have been pleased but it wasn't. Now that the neck was straight and the bridge was in the right spot, the pickups were no longer in line w/ the strings. Blast! There's really not much I can do about it w/o redoing the whole damn thing so I'm leaving it like that for now. I also rewired it so it didn't have all that goofy stereo crap going on, which was always weird and problematical and I never used for anything other than screwing around. I also unhooked the push-pull pots I was using for pickup selection and threw a Gibson-style toggle sort of awkwardly into the mix. Works but it's kind of cramped.

I also had to level and crown the frets to get it playing w/o a hideous amount of buzz. The neck really was a trainwreck. In hindsight I wish I hadn't cheaped out and got something decent. Here is the guitar w/ it attached:


Now that is one fine fiddle! Seriously, it's not that bad. If I ever get around to it, I'll re-rout the pickup slots so I can move them where they need to go and then make a pickguard to cover all the mistakes up. If I really wanna get into it, I can fill the wood and refinish in a solid color. Might be worth it as I can fix some other crap too while I'm at it. It's still pretty fun to play and having the pickups out of whack doesn't seem to affect the tone much at all. The neck is a big fat vintage baseball bat so it's good to practice on. Makes my other guitars feel tiny and insignificant, thusly allowing me to better bend them to my will.

The Warmoth neck is now going to go on the cheapo guitar project. Somewhat ironical but there you go.

Tuesday, November 6, 2007

Master Templates

Well, if you're anything like me, every now and again you just gotta get your best scratchy cough out and call into work so you can take the day off to build guitars in your back yard. I did that yesterday and, let me tell you, it's a hell of a good feeling. Not gonna let the man hold me down. (Who's w/ me!?) My task for the day was to get a couple templates done for a couple elements of my next guitar. Last time, I made the mistake of building all of these things into the template for the guitar. This is very convenient for one project but makes it a little more troublesome when you move onto the next shape and have to do everything all over again. This time, I'm made each element on a different piece of mdf for greater versatility.

The two pieces I made were for a humbucker rout and for a tele-style neck pocket. These will be common elements on guitars I make in the future so this will equal a lot of time saved. I made these on quarter inch mdf this time. Last time, I used three quarter inch and it was a beast to shape and very frustrating to get accurate.

The first step is to draw everything out very carefully w/ a straight edge and a carpeneters square. I got the measurements I needed from various places online. This took me about an hour and half. For the last project I didn't have this kind of patience but now that I know I can pull it off, it's easier to reach down into the depths of my psyche to find another five minutes of attention span to erase a line and redraw more accurately.

This is the neck pocket:


I made the top of it extend an inch longer than it had to be. Hopefully, this will give the router something better to rest on when I use it so I can better control it. There's lines drawn so I can get it in the right place.

Same deal w/ the humbucker routt:


Ultimately, it was a mistake to cut it out so small, at least before I had the middle cut out. It made it really hard to clamp down as I worked on it:


It was too small for me to use a jigsaw so I had to use a coping saw. As seen in the picture above, I drilled out the corners w/ a handbill so I could turn the blade. The initial cut was none to accurate:


But some time w/ a file got it in good shape pretty quickly (I actually filed it a bit more from this point and it looks very clean now):


Same deal w/ the neck pocket only this time I could use the jigsaw to save time (and I'm actually more accurate w/ that than a coping saw). It is nearly perfect:


This all came together a lot quicker and better than previous efforts so I'm pretty pleased. The only problem w/ using the quarter inch thick mdf is it's really too thin to use directly on a guitar so I will need this to make some thicker templates. It's worth the extra effort for the added accuracy.

Monday, October 29, 2007

Shaping and Scraping

Ok... My camera is giving me shit so if you're just here for the pics, this is all you get:


So there you have it. That's the body of the cheapo guitar cut to shape and routed. I used pretty much the same method as I did on the baritone body. The only difference is this time I frakked up the glue joint between the two pieces of wood so the top of the thing wasn't quite level so before I started I put some eighty grit paper on my random orbital sander and whirred it across the top and back a few times. Worked like a charm. I used the same template as I used for the baritone body. I like it and just can't think of anything better.

First thing I did was trace the outline on the body and do a rough cut w/ my jigsaw. Last time I tried to use a smooth cutting blade and get as close as possible, which worked OK. This time, I just went ahead and used a fast cutting blade and stayed about a half inch outside of the line. If anything, this method left me w/ less wood to cut away during routing--and it must have saved me fifteen minutes or a half hour w/ the jigsaw. Of course, it could have just been the fact that I have greater and more substantial jigsaw skill now but I really do think this was the better method of doing the rough cut and will continue to use it in the future.

After that, it was a simple matter of routing. I set up my template follower to cut a sixteenth of an inch outside the line and am glad I did. There was a little bit of tear out but, unlike last time, I left some extra wood. Once I was done routing, I just took my trusty random orbital sander and sanded down to the line.

So far, I must say this is head and shoulders above the first one and I think I'm gonna buy a nicer neck than I originally planned. I like the kinda weird streaks on the cheapo alder I'm using and I think this one will be nice enough just to finish w/ a couple or five clear coats. I'm thinking I will get a tele-style neck w/ a maple fingerboard and it will look really simple and classy. Probably go w/ chrome hardware and chrome-covered humbuckers. The only weird thing is it's gonna have about six knobs because of the electronics I'm gonna cram in there.

Thursday, October 25, 2007

Gluing Up a Blank

For some reason, I never seem to get around to working on my new project, the cheapo guitar. It is mostly laziness combined w/ the fact that I have a new band started up which takes a great deal of my time. Also, it's fall now so by the time I've relaxed for an hour after work, it's already getting dark and I'm not keen on using power tools w/o proper illumination. However, I did finally get around to gluing up the body blank, which is a relatively simple process.

First thing, the two pieces of alder I bought off the world's most famous auction website had roughly sawed edges that needed to be straightened to be jointed so I could glue them. Originally, I had planned on using a router table for this but, alas, the one I got off that same auction site is the right kind for my router--thought I had a great bargain on it too. Instead, I used a hand plane, which is a fun tool that makes fun, long shavings:


Having never used one of these bad boys in the past, I spent about twenty minutes fixing the mistakes during the first five minutes. Nevertheless, I managed to get it pretty well straight. I checked my progress continually throughout this process w/ a straight edge to make sure I was keeping it real.

Then I put a generous amount of wood glue on there. The brand I chose was Titebond but only because Elmer's (which should work just fine) seemed to commonplace for use in luthiery. Plus, I was pretty damn certain that I wanted it bonded tite-ly.

For some reason, I always think wood glue looks delicious, like a vanilla milkshake:


After I got the two pieces together, it was just a matter of clamping things up and wiping off the excess glue:


Unfortunately, I wiped too much excess glue off and actually manage to suck some out of the joint w/ a paper towel. Just a little but once it was dry, I squeezed some more glue in there to fill up the crack:


Now it is right as rain and feels completely sturdy, like it's a solid piece of wood. Unfortunately, I didn't quite get the two pieces of wood completely even. That is something I'm going to be able to hopefully deal w/ this weekend.

Tuesday, October 16, 2007

A New Engine for the Hollowbody

A while back I found a really cool Ibanez Artcore hollowbody guitar on clearance at my local guitar warehouse of super proportions. It only cost two hundred bucks so I bought it on the spot and have regretted the descision exactly never. It is a fine looking, great playing and decent sounding guitar. The only problem was the stock pickups were about as flat as your back. Of course, I will not let such things stand in my house so I set about changing them. Ultimately, I chose to use some GFS Retrotrons I had laying about. I originally had them in the SGeezus but found them a bit to chimey for the inherantly dark sound of that guitar but they seemed a perfect fit for the hollowbody. At the very least, I figured, they wouldn't be so dull sounding. I also wanted to try out a super fancy RS Guitarworks wiring harness so I figured I'd give that a go too. Let me tell you, replacing the pickups in a hollowbody is as harrowing an adventure as you could imagine.

First, I took the thing apart:
And already my first surprise! The bridge isn't attached to the body in anyway aside from the pressure from the strings. OK. I guess I will just have to put it back on. These are the original electronics:


As you can see, the pickup selecter switch is weird and cheap looking and the pots are teeny tiny. They weren't problematical but I felt there was a very high chance of failure. I will give Ibanez this: they were at least the correct values. A lot of times in cheap guitars they'll just use whatever's cheap. No 100K volume pots here.

The next step was wiring up the harness. I had a bit of frustration w/ this and didn't end up taking any pictures. Sorry. It turns out my trouble was the tip of my soldering iron was just old so I replaced it. No big deal. It also helped to use a little extra flux. I got some that was safe for electronics work in a little tin from a giant electronics chain.

Next was the hard part: getting the harness in there. Lord. This experience was so harrowing I don't even want to think about it. You gotta work through the pickup slots and the F-holes the whole time. I have big lardo mega fingers so this was not easy. You pull the pots and other components through w/ string (I used thread, doubled up) and it is even more difficult than you'd expect. The whole thing was a mess:


Eventually, I got 'em in though and it was honestly thrilling to finally be done w/ it. It took me over a week whereas it takes me maybe two hours to wire up a regular electric guitar. I must say the new pickups are really sharp:


As mentioned, they are GFS Retrotrons. Specifically, the bridge is a Hot Liverpool and the neck is a regular Liverpool. They are modeled after the old FilterTron pickups like you might see in a Gretsch. It's at least a distinctive look where people can tell it's customized right away. The sound of them is exactly as hoped--very clear, bright but still smooth. It's brought new life to the guitar. The RS Guitarworks harness works well too. The volume knobs especially are much more usefull. The guitar doesn't get all kinds of dull sounding when you turn them down.

And here she is in her entirety, not bad for $200 and some pickups I had lying around:

Sunday, September 2, 2007

SGeezuz is Risen!

For some time now my SG Special Faded (2002-ish w/ the half moon inlays, too cool for words) has been in some sorry shape. It just sounded dull. Imagine you have the deadest strings you've ever had in your life only worse. Even brand new strings would sound bright but there'd be this weird undercurrent of mud. I couldn't figure it out. I swapped in two different sets of pickups and dropped in a replacement bridge and it sounded different, maybe better, but there was still a general problem w/ the overall sound. Eventually, I narrowed it down to the bridge posts. This had been my one workhorse guitar for many, many years and over time my sweat had actually weakened the wood around the original posts. As you can see here, especially on the bottom, it is pretty gross:


(Also, you can see the GFS Crusader pickup I have in the bridge there. Great sounding pickup. Judging by the appearance it is meant to be a Duncan Invader clone and I guess it is pretty close in terms of output but maybe it's not quite a snarly and a little warmer sounding.)

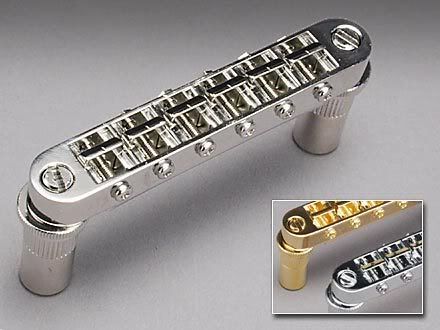
Now since the wood surrounding the posts was the problem, I was either going to have to drill them out and dowel them or find a bridge w/ larger posts. I opted for the later. The bridge I used is a Gotoh tune-o-matic:


As you can see, they mount on big bushings almost like a wraparound bridge. Some people don't like Gotoh hardware but I think they're nuts. I have some Gotoh mini tuners on my baritone and I think they're as good as anything. I think they get a bad name because they're more of a budget brand but, honestly, they're made in Japan and I doubt many humans on this planet could tell the difference between their stuff and, say, Schaller in a practical setting (not to say that the Schaller aren't made better--I don't know one way or the other).

The installation of this is simple (though it took a good deal of web searching for me to be satisfied that I knew what I was doing). You just drill holes and tap 'em in w/ a mallet. It's that simple. I wanted to use an 11 mm bit but my local orange warehouse of overpriced tools didn't have metric bits. I settled for 7/16 inch. Since my drill press isn't large enough to drill tune-o-matic posts, I made a little guide out of some scrap MDF. To judge my depth I used a piece of masking tape, which always works like a charm.

As you can see, there' s not much marine of error between he depth I needed for the bushings and the thin SG body:


I very carefully drilled through a piece of masking tape. (The tape keeps the finish from chipping--not a big deal on this guitar.) It worked well enough:


I pressed in the bushings w/ my fingers and then gave 'em a few good whacks w/ a rubber mallet for good measure. I'm not sure if this is the right way to go about things but it feel sturdy to me. The holes in the pick guard weren't big enough for the bushings so I routed it out to fit them. Kinda got a little wild w/ it so it's not pretty:


Fortunately, this is mostly covered by the bridge posts once it's fully installed. It also so happens that the tops of the bushings are just about flush w/ the pickguard.

W/ that taken care of, I decided I might as well change out the tuners while I was at it. I had some Planet Waves auto-trimmers on there for a couple years and while I like 'em OK, I could never really get used to them. Also, I lost a piece of one of them so I had to put on of the original Gibson tuners on there, which looked kinda cool in a used and abused kinda way:


I liked the look of the stock Gibsons but I thought I might try something else just because so I got some Grover keystone style ones that looked the same but hopefully are a bit higher quality. These are a cinch to swap out. Unscrew the nut on top w/ a wrench and and take out the screws on the back. Do the reverse to get the new ones on. Voila!


And there she is, the SGeezus. I need to give it a couple days to be sure but as of now it's looking like the new bridge fixed her right up. Since I detune two and a half steps down, the intonation is a little off (always the case w/ tune-o-matic bridges) but the sound is much, much clearer now.